Friday, December 26, 2008

Eating My Curds and Whey

Sorry I haven’t posted for a while, my laptop died and took with it several draft postings. I’m still getting my new laptop setup and have to recreate a lot of my work.


Homemade Ricotta Cheese


Why?

I remember growing up that a few times my dad tried to make homemade cheese. It was a fascinating process, but I honestly don’t recall if any of them ever turned out. I’ll have to ask him about that. Anyway, I was reminded of this when I came across another food blogger’s post about making homemade ricotta cheese. Bingo! This was just the thing I needed to make my ravioli a little extra special and redeem myself for not making my own fresh pasta sheets (I'm a big fan of wonton wrappers!)


What?

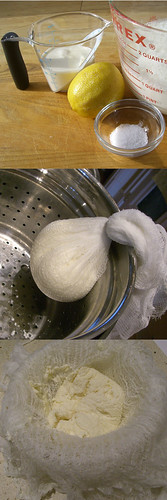
This is ridiculously easy! If you can boil water, you can make ricotta. The only special equipment you need is cheese cloth, go figure. Mine came out very creamy, more like a cross between ricotta and cream cheese. I’m going to experiment with a little more stirring next time to encourage larger curds to form. I’m also wondering about if it’s possible to make goat’s milk ricotta?


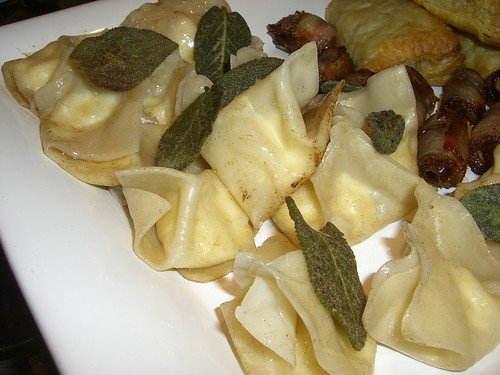
I mixed half of my homemade ricotta with a little more cream and a little lemon zest and used it as filling for ravioli on Christmas Eve. See the final product, ravioli in brown butter and fried sage, at the bottom of the page. The cheese was deliciously rich and the lemon zest added brightness to the flavor.


How Much?

1 quart whole milk – $1.69

1 8oz carton heavy cream – $1.99

1 lemon – $0.70

Total – 4.38


The Recipe (from Gourmet, April ’06):

Homemade Ricotta

Ingredients
1 quart whole milk
1/2 cup heavy cream
1/4 tsp coarse salt (kosher or sea salt)
Juice from ½ lemon (about 2 tablespoons)

Directions

1. Combine the milk, cream, and salt in a heavy saucepan. Separately, line a colander with cheesecloth and set it in a large bowl. Measure out the lemon juice and set it aside.

2. Bring the milk mixture to a simmer over medium high heat, stirring occasionally with a spatula to prevent scalding. Once the mixture has reached a steady simmer, add the lemon juice and stir gently with the spatula — quickly, just to blend. Let the mixture sit for about 1 minute, turning down the heat slightly so it stays at a simmer but doesn’t reach a hard, rolling boil. Stir with the spatula after about 1 minute, then let it sit another minute or two until it looks like most of the liquid has separated into curds and whey. (See note below.)

3. Drain the mixture into the cheesecloth-lined colander set over a bowl, and let it drain at room temperature for 1 hour. Transfer the ricotta to an airtight container and refrigerate.

Makes about 1 cup.

Note: My curds and whey seemed to take a bit longer to separate, so I added another couple tablespoons of lemon use. It worked out fine, and did not affect the flavor. I’ll try a little more patience next time.

Saturday, December 6, 2008

About: Essensia!

Let me tell you "About:"... In addition to my recipe posts, I’m adding a new alternative post to my blog. My new “About:” posts will be shorter and focus on a single topic. I’m doing this because sometimes I’ll run across something (an ingredient, a restaurant, a wine, you name it) that doesn’t warrant a full out posting, but that I want to share with my friends and readers nonetheless. So…

Let me tell you About… Essensia!


Essensia is a delicious dessert wine my partner Gene and I discovered at a wine and cheese tasting several years ago. We like it so much that it’s rare we don’t have a bottle chilling in the refrigerator.

It is a sweet, honey-colored wine made from Orange Muscat grapes by the Quady Winery in California. Served cold, it pairs outrageously well with room-temp blue cheese (imported Societe is our favorite).
It would also pair well with chocolate or fruit desserts. Most often we’ll just have a tiny glass all by itself at the end of the evening.

Essensia is available locally. Here in DC, I buy the
750ml bottles at Calvert-Woodley for between $21-$25. It also comes in 375ml bottles (great for gift giving).

Enjoy!!

Friday, December 5, 2008

It's Swellington!

Why?

My partner, Gene, inspired this dish. We’d been eating a lot of puff pastry this summer. A lot as compared to almost none over the past 15-years. Anyway, Gene suggested we “do something with it”. The something turned out to be a Salmon Wellington, salmon wrapped in puff pastry (immediately dubbed Swellington by our friend Lawrence.)


What?

Our first attempt came out rather comical in appearance but quite delicious in flavor. Comical in that we cut the salmon into long fillets. When wrapped in pastry they formed elegant packages about 7 – 8 inches long and a couple inches wide. Well the pastry was true to its name and buffed. The Swellington came out of the oven looking like fluffy femur bones; all knobby on the ends and slender in the middle. But as I mentioned the flavor was great. Each bite a mixture of buttery, golden, crispy pastry and rich, perfectly done, pink salmon. Yum!


How Much? (assuming you have white wine vinegar and butter on hand)

Salmon Fillets - $16.48

Buff Pastry - $3.99

Basil - $1.99

Onion - $0.59

White wine – $12.99 (the recipe only takes a cup, so drink the rest with dinner!)

Total – $36.04

The Recipe:


Salmon Wellington (aka Swellington)

Ingredients

1 17.3-ounce package frozen puff pastry (2 sheets), thawed

4 3/4-inch-thick 6-ounce skinless salmon fillets

1 tablespoon butter

6 tablespoons minced onion

2 tablespoons white wine or vermouth

4 tablespoons plus 2 teaspoons chopped fresh basil, tarragon, or parsley (or combination)

1 egg beaten to blend (for glaze)

Sauce

1/2 cup dry white wine

1/2 cup white wine vinegar

1/2 cup (1 stick) chilled butter, diced


Preparation


For the salmon:

Preheat oven to 400°F.

1) Melt butter in a small sauté pan. Add 4 tablespoons onion and sauté until translucent, 3-5 minutes. Remove pan from heat and stir in wine and 4 tablespoons of basil. Set aside.


2) Roll out each pastry sheet on lightly floured surface to 12-inch square. Cut each in half, forming four 12x6-inch rectangles. Place 1 salmon fillet (see note 1) in center of a rectangle, about 1 inch in from and parallel to a short edge (depending on the thickness of the fillet). Sprinkle each fillet with salt, pepper, and spread salmon evenly with a fourth of the onion/basil mixture.


3) Brush edges of rectangles with some glaze. Fold the short edges of pastry up and the long side over the top of the fillet enclosing it. Trim away any excess pastry and pinch to seal edges of pastry (see note 2). Repeat with remain fillets.


4) Place pastries on a lightly oiled baking sheet. Brush with glaze. Bake pastries until dough is golden brown, about 20 minutes. Remove from oven; let stand 10 minutes.


For the sauce:

Meanwhile, boil ½ cup wine, vinegar and 2 tablespoons onion in heavy small saucepan until liquid is reduced to 6 tablespoons, about 8 minutes. Remove pan from heat. Add butter 1 piece at a time, whisking until melted before adding next piece. Whisk in remaining 2 teaspoons of fresh herbs. Season sauce with salt and pepper.


To Serve:

Spoon a quarter of the sauce onto a plate and place the Swellington along side and serve.


Note 1: If necessary, salmon fillets can be cut and pieced together from compact, even rectangular “brick” of salmon.

Note 2: Extra puff pastry can be used as decoration on top of the Swellington. Cut out shapes (like leaves, flowers, geometric shapes), moisten them with a bit of water and arrange on top of the Swellington.


Sunday, November 30, 2008

Braised Beef and Onions

Why?
I bought a nice, little chuck roast on sale, brought it
home and had no idea what to do with it. I had some onions in the house so I googled “beef chuck roast onions”. My big constraint was I had only ½ bottle of wine in the house and didn’t feel like running out for more. That 375ml of red was for drinkin’, not for cookin’! Well, I hit the jack pot with this gem of a recipe (to which I of course added a few of my own ideas).

What?

It's really just four main ingredients, beef, onions, garlic, and allspice. The allspice kind of threw me at first, but I thought what the heck. After hours in a hot oven, the beef comes out just falling apart and covered in silky, sweet, roasted onions. For my second go-around with this recipe I added a few potatoes and some carrots to the pan about an hour before it was done making it a one-pot meal.
You’ll notice the picture of the Ommegang ale; it doesn’t go in the beef, it goes in the cook (though it would be tasty either way.)

How Much?
I bought the beef and vegetables at Giant, but picked up allspice at Yes! Organic; they’re a great source for fresh spices in bulk. I bought about 3oz of allspice for $2.20 but the recipe only uses about ¼-oz.

Boneless Chuck Roast – 10.74
Onions - $3.10
Garlic - $1.00
Allspice - $0.25
Parley - $1.99
Total - $17.08


The Recipe:


Braised Beef and Onions

Makes 4 servings
active time: 15 min
total time: 3 hrs

Ingredients
1 (2-2 ½ lb) well-marbled boneless beef chuck pot roast
2 teaspoons ground allspice
2 teaspoons salt
2 teaspoon pepper
3 very large onions, sliced ¼ inch thick (6-8
cups)
3-4 large garlic cloves, slivered
2 bay leaves (optional)
4 tablespoons finely chopped flat-leaf parsley

Preparation
Put oven rack in middle position and preheat oven to 400°F.
1) Stir together allspice, salt, and pepper in a small bowl and set aside. (Optional substitute 1 teaspoon ground cinnamon and 1 teaspoons chili powder for the allspice.)

2) Pat meat dry. Using a small paring knife slice deep cuts into the meat and stuff slivers of garlic into the cuts working your way around both sides of the meat until it is evenly studded with garlic. (Any leftover garlic can be added to the onions later.) Rub the allspice mixture all over meat.

3) Spread half the onions in a 13- by 9-inch roasting pan and arrange meat on top. Spread remaining onions over meat (and if using, add bay leaves and any remaining garlic). Tightly cover pan with a double layer of foil and roast for 1 hour.

4) After an hour, turn the meat over and spread some of the onions from the pan over the roast. Recover the pan tightly with foil and cook until
meat is very tender, about an additional 1 1/2 hours. (Optional: remove the foil for the last 1/2 hour to allow pan juices to reduce a little and onions to caramelize.)

5) Skim fat from pan juices. Slice meat across the grain and sprinkle with parsley. Serve with onions and pan juices.

Sunday, November 23, 2008

Stuck a feather in my cap and called it ravioli!


Why?

Because I love fresh pasta, but it can be a chore to make (and besides my pasta maker broke and went in the recycle bin two months ago!). So, do we do without homemade ravioli? Not on your life. Wonton wrappers to the rescue.

What?

This recipe was inspired by a cooking class I took at the Food and Entertainment Expo last year. In the class we made fresh pasta sheets and hand chopped all the ingredients. It made for a fun time chatting with other students, but who has time for that on a regular basis? With a food processor and wonton-wrappers these raviolis are quick and versatile. The recipe below calls for walnuts, but you could easily substituted left over rotisserie chicken or cooked winter squash or sautéed mushrooms. I served mine with left over ragù (see my Going for Baroque! post from 1 Nov.) but you could easily doctor up some store bought sauce with sautéed sausage or hamburger.

How Much?

Wonton Wrappers – $3.99

Ricotta Cheese - $2.49 (8oz container)

Walnuts - $3.79 (8oz container)

Parmesan Cheese - $4.99 (6oz container)

Pesto - $3.29 (10oz jar)

Total - $15.26

The Recipe:

Pesto and Walnut Ravioli

Serves 2 (generously!)

Ingredients

8oz Ricotta cheese

8oz Walnuts

1/3 cup shredded Parmesan cheese (plus more for garnish)

3 tablespoons pesto (homemade or store bought)

½ teaspoon each salt and pepper

24 wonton wrappers

For filling:
Place all ingredients, except wrappers, in a the bowl of a small food processor fitted with a steal blade and process until very well mixed and finely chopped. DO AHEAD: Can be made 1 day ahead. Cover; chill.

For ravioli:
Arrange 6 wonton wrappers on work surface. Place approximately 1 tablespoon cheese filling in center of each wrapper. Using fingertip, dampen edges of wrappers with water. Fold in half, pressing out air, and pinching edges to seal tightly. Repeat with remaining wrappers and filling. DO AHEAD: Can be made 8 hours ahead. Cover and chill.

Cook ravioli in a large pot of gently boiling, generously salted water until tender, about 3- 4 minutes. Transfer ravioli to plates and top with a sauce of your choice. Sprinkle with Parmesan and serve.

Sunday, November 16, 2008

A Must-See Seafood Stew

Why?
I found the delicious seafood stew recipe hiding in my giant Gourmet Cookbook. Though the name Cioppino sounds Italian the recipe is from San Francisco. The legend is that name comes from when the Italian and Portuguese fishermen made a communal meal they’d “chip in” what they could from that days catch.

What?
Don't let the long list of ingredients scare you off. There is a good bit of cutting and chopping, but this stew is pretty quick and easy to prepare. The recipe had some nonsense about a frozen king crab leg; I nixed that all together. Also I had extra green and banana peppers from our last CSA delivery so I tossed those in. It’s a very versatile and hearty dish.
I bought the clams, scallops, and shrimp at Jesse Taylor’s Seafood at the fish market on Maine Ave. The salmon was one of those big farm-raised slabs from COSTCO.

The Recipe:
Cioppino

4 large garlic cloves, minced
2 medium onions, finely chopped
1 Turkish bay leaf or 1/2 California bay leaf
1 teaspoon dried oregano, crumbled
1 teaspoon dried hot red pepper flakes
1 1/2 teaspoons salt
1/2 teaspoon black pepper
1/4 cup olive oil
1 green bell pepper, cut into 1/4-inch dice
1 red bell pepper, cut into 1/4-inch dice
2 tablespoons tomato paste
1 1/2 cups dry red wine
1 (28- to 32-ounces) can whole plum tomatoes, drained, reserving juice, and chopped
1 cup bottled clam juice
1 cup chicken broth
18 small (2-inch) hard-shelled clams (1 1/2 pound) such as littlenecks, scrubbed
1 pound skinless red snapper, salmon, or halibut fillets, cut into 1 1/2-inch pieces
1 pound large shrimp (16 to 20), shelled (tails and bottom segment of shells left intact) and deveined
3/4 pound sea scallops, tough muscle removed from side of each if necessary
1/4 cup finely chopped fresh flat-leaf parsley
3 tablespoons finely chopped fresh basil
• Garnish: shredded fresh basil leaves and small whole leaves
• Accompaniment: foccacia or sourdough bread

Preparation
Cook garlic, onions, bay leaf, oregano, and red pepper flakes with salt and pepper in oil in an 8-quart heavy pot over moderate heat, stirring, until onions are softened, about 5 minutes. Stir in bell pepper and tomato paste and cook, stirring, 1 minute. Add wine and boil until reduced by about half, 5 to 6 minutes. Add tomatoes with their juice, clam juice, and broth and simmer, covered, 30 minutes. Season with salt and pepper.

Add clams to stew and simmer, covered, until clams just open, 5 to 10 minutes, checking every minute after 5 minutes and transferring opened clams to a bowl with tongs or a slotted spoon. (Discard any unopened clams after 10 minutes.) Lightly season fish fillets, shrimp, and scallops with salt and add to stew, then simmer, covered, until just cooked through, about 5 minutes. Discard bay leaf, then return clams to pot and gently stir in parsley and basil.
Serve Cioppino immediately in large soup bowls.

Saturday, November 1, 2008

Going for Baroque!

Baroque Ragu


Why?

Now that the weather is getting cooler and it’s time to eat heartier food, I’m planning to make a variety of ragùs. They are a perfect fix for our cold, damp, Mid-Atlantic winters. I’ve never made these rich meat-based Italian sauces before so I decided to start with a classic one.

What?

I turned to my The Splendid Table cookbook. It concentrates on food from the “Heartland of Northern Italy” and has several ragù recipes (all of which I want to try in the next few months). For my premier sauce I selected a Baroque Ragù. With four different meats plus sausage, pancetta, and cream, this sauce served over pasta with some grated Parmesan will surely melt any blizzard!

This is definitely a make-it-on-the-weekend dish as the recipe spans two full pages. One short cut I took was to use a “meat loaf” mix of ground pork, beef, and veal rather than chopping my own (even in the food processor that takes time). Also I got my chopped vegetables from the salad bar at the grocery store. I forgot to by the pancetta, so I substituted bacon. As well I used a combination of store bought beef and chicken stock as apposed to homemade as the recipe calls for.

How Much?

Unfortunately, I didn’t keep all my receipts together so I can not give you a cost break down for the meal, but as you can imagine with all of the meat it wasn’t cheap. However, it made a very hearty dinner for two and an additional 4 – 5 moderately sized lunches.

The Recipe:


Thursday, September 25, 2008

Quick and Easy Cannoli

Why?

I needed dessert for four in a hurry!


What?

Okay, so I didn’t make these cratered, crunchy, creamy cannoli, but I was clever enough to hunt them down! I bought these at Jennifer Glasgow’s Fine Sweet Shop in Eastern Market (7th Street & North Carolina Avenue, SE - Washington, D.C.) The cannoli were delicious; crispy, crunchy outside and creamy, not-too-sweet inside. The Fine Sweet Shop also carries a variety of cookies, cakes, and cookies; some elegant, some simple. This was the first item I’ve bought from them, but they are now my go-to place for desserts.


I served them to friends for dessert the other night with a scoop of Laloo’s brand goat’s milk ice cream from Whole Foods.


How Much?

Cannoli - $9.00 ($2.25 each)

Ice Cream - $3.98

Total - $11.98


The Recipe:

Well…ya’ drive to Eastern Market with 9-bucks in your pocket.

Sunday, September 7, 2008

Figs are in season!

"I might try to plant a fig tree. A man's entitled to that, isn't he?" - Zefram Cochrane

Why?
I planted a fig tree in the backyard about four years ago (thank you Joanie and Lawrence!) and this year it is mega-producing.
Our figs are a vibrant green tinged with yellow when ripe and have a gorgeous pomegranate-pink inside. They are delicious to eat plucked right off the tree. It reminds me of the farm I grew up on where we grew apples, cherries, apricots and more. They were so good fresh off the tree. Now, with such an abundance of figs, I thought I’d try them in a recipe.


What?
Last night I made Figs Wrapped in Bacon as an appetizer.
I'd looked at similar recipes online and I created this one myself. I stuffed the figs with creamy, white goat cheese, wrapped them in bacon, and hit them with a little freshly ground black pepper just before they went the oven for a few minutes.

How much?

Figs – free

Goat Cheese - $1.80

Bacon - $1.00

Total - $2.80


The Recipe

Figs Wrapped in Bacon

Serves 2

Prep Time: 15 minutes

Cook Time: 15-minutes

Ingredients:

6 fresh figs

2-oz goat cheese

3 strips bacon, sliced in half lengthwise

Freshly ground black pepper

Method:

1. Preheat oven to 375-degrees

2. Slice a fig vertically down to about the center. Stuff fig with about a teaspoon of goat cheese. Wrap the half bacon strip around the stuffed fig and secure with a toothpick. Repeat with remaining figs.

3. Arrange stuffed figs on a baking sheet lined in parchment paper. Give each fig a grind or two of black pepper. Bake until back starts to crisp, 12 – 15 minutes.

4. Allow to cool about 5 minutes before serving.


The Results

As I mentioned, this was my first cut at this recipe. I think it worked pretty well. The warm creamy goat cheese blended well with the warm creamy fig. However, my figs are not really that sweet. The flavor contrast I'd wanted between the salty bacon and sweet fruit was too subtle. Next time I will try using a mild blue cheese. That should give the same creamy results but with some added flavor. To enhance the sweetness I’ll try a little honey on each fig.

End Note: I am also thinking about a “raw” version of this recipe using prosciutto instead of bacon and skipping the oven!

Wednesday, September 3, 2008

Beef Stew on a Wednesday night?

More often than I like to admit, I come across a recipe that I obsess about trying. It’s like a song stuck in my head, I keep thinking about it and it has be made. My latest fixation is Joues de Boeuf aux Agrumes (Beef Cheeks Braised in Red Wine with Orange Zest) from the September 2008 issue of Gourmet Magazine.

Why?

An obsession is a preoccupation with an often unreasonable object or idea. What could be unreasonable about making a beef stew? Well for one, it was 90-degrees outside today and a stew seems a bit too hearty. Also, it’s a weeknight; the beef has to braise for 3-hours. We’ll be eating at 10pm! Oh well, I’m cooking on the right side of my brain, logic and reason don’t usually play center stage.

What?

For this recipe, I am using the chuck roast from Brookville Market (since beef cheeks are a little scarce this side of the Atlantic). I also have a huge red onion and a package of rainbow baby carrots (white, yellow, and orange). My wine is Fish Eye Cabernet Sauvignon.

How much?

Meat - $9.62

Onion- $1.15

Carrots - $2.99

Wine - $8.99

Total $22.75

The Recipe

Joues de Boeuf aux Agrumes

(Beef Cheeks Braised in Red Wine with Orange Zest)

Serves 4

  • Active time:45 min
  • Start to finish:3 1/4 hr

September 2008

The flavor of the wine looms large in this meaty braise, lending an extraordinary savoriness to the melt-in-your-mouth carrots. For more recipes inspired by the City of Light, visit our Paris City Guide.

2 lb beef cheeks or boneless beef chuck roast

2 tablespoons grapeseed or vegetable oil

1 lb onions, coarsely chopped

1 lb baby carrots, peeled

1 (750-ml) bottle dry red wine

6 to 8 (3- by 1-inch) strips of orange zest

  1. Preheat oven to 350° with rack in middle.
  2. If using chuck, cut across grain into 4 pieces.
  3. Pat beef dry and season with 1 tsp salt and 1/2 tsp pepper. Heat oil in a 4- to 6-qt heavy pot over medium-high heat until it shimmers. Brown beef on all sides, 6 to 10 minutes total. Transfer to a plate with tongs.
  4. Add onions, carrots, 3/4 tsp salt, and 1/2 tsp pepper to pot and cook, stirring occasionally, until vegetables are softened, 8 to 10 minutes. Add wine and zest and bring to a boil. Add beef and return to a boil. Cover pot and braise in oven until meat is very tender, 2 to 4 hours (beef cheeks take longer than chuck). Season with salt and pepper. Serve beef with carrots and sauce.

The Results

Post script: YUM! The meat and veggies were wonderful, velvety done! The stew’s broth was very thin. I scooped out the meat and most of the veggies and then used an immersion blender to puree the rest into a thicker sauce. Next time I will dredge the beef in flour to thicken the sauce as it cooks.